Install the Kisi Controller Pro 1
As the very first step, you need to install the Controller, Kisi's central hardware unit that enables you to access your doors with the Kisi system.
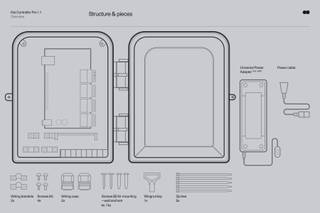
Controller kit components
- 1x Kisi Controller Pro
- 1x 24 volts universal AC power supply
- 1x power cable
- 2x wiring brackets
- 2x wiring caps
- 4x screws (type A)
- 4x wall anchors
- 4x screws for mounting (type B)
- 1x wingnut key
- 5x zip ties
Tools required
- Philips and small flathead screwdrivers
- Wire cutters
- Low voltage cables (e.g. 18 gauge)
- Ethernet cables (CAT6)
- Wire connectors
- 3/16-inch (5mm) drill bit for wall anchors
- Working internet connection (Ethernet or Wi-Fi)
Mounting the Kisi Controller Pro 1.1
Before you begin installing the controller, make sure to note down the device token, device ID, Ethernet MAC, and, if applicable to your model, the Wi-Fi MAC. You can easily find this information on a label attached to the controller itself.
- Drill four holes for the wall anchors using this drilling template (US Letter size)
- Insert the wall anchors into the holes
- Next, screw the mounting screws into the wall anchors
- Hang the controller on the screws, using the holes in the back of the controller case
FCC caution
Changes or modifications not expressly approved by the party responsible for compliance could void the user’s authority to operate the equipment.
This device complies with part 15 of the FCC Rules. Operation is subject to the following two conditions: (1) This device may not cause harmful interference, and (2) this device must accept any interference received, including interference that may cause undesired operation.
This transmitter must not be co-located or operated in conjunction with any other antenna or transmitter.
On to the next step
Now you are ready to wire the Kisi Controller Pro 1.