Wire the Wiegand board
After attaching the Wiegand board to the Kisi Controller Pro 2, you can proceed to connect legacy controllers and readers to the Wiegand board. Additionally, the Kisi Controller Pro 2 with Wiegand board can be connected to another Kisi Controller Pro 2 with Wiegand board.
Please note that the scenarios discussed below are commonly referred to as 'landlord scenarios' because, in these situations, Kisi controllers are frequently wired to legacy hardware.
- Landlord scenario with mobile unlocks only: By wiring legacy controllers to the Kisi controller, you can utilize Kisi's mobile tap in-app unlocks to unlock doors
- Landlord scenario with mobile and physical credential unlocks: By wiring both legacy controllers and readers to the Kisi controller, you can utilize both Kisi's mobile tap in-app unlocks and low-frequency RFID credentials to unlock doors
- Wiring two Kisi Controller Pro 2 units together via the Wiegand board
Please note that the below scenarios are applicable even if the landlord has a Kisi controller equipped with a Wiegand board.
Landlord scenario with mobile unlocks only
As a tenant in a multi-office building, you may encounter a main entrance door that uses a legacy access control system. With Kisi, you can still ensure continuous access from the entrance door all the way to your own office door using Kisi's mobile tap in-app unlocks. This allows for a seamless transition between the two doors, providing a secure and efficient solution for accessing your office.
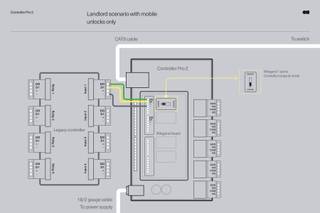
- Locate one of the inputs on the legacy controller
- Locate the four Wiegand device interfaces on the Kisi Controller Pro 2
- Select one of the available Wiegand interfaces, and locate the seven ports on it
- Wire the D0 port on the Wiegand board to the D0 port on the legacy controller's input (Data line 0)
- Wire the D1 port on the Wiegand board to the D1 port on the legacy controller's input (Data line 1)
- Wire the - port on the Wiegand board to the - port on the legacy controller's input (Ground). Always verify that the ground is securely connected between the legacy controller and the Kisi Controller Pro 2.
- On the Wiegand board, toggle the switch of this specific Wiegand interface to
CONTRLmode
Please note that on certain Wiegand products, as well as on some of our Wiegand board offerings, the notation of "+" typically denotes 12V, while "-" signifies GND (ground).
Since there are four Wiegand interfaces available, you can wire up to four legacy controllers to the Kisi Controller. Make sure to use separate Wiegand channels for all your legacy controllers, and select the corresponding Wiegand channels during the web configuration.
Once ready, go ahead and assign a door and a credential to your legacy controller.
Landlord scenario with mobile and physical credential unlocks
By wiring legacy controllers and readers to Kisi, you can enable both mobile and card unlocks using Kisi. Depending on your use case, you can either utilize Kisi as a shared or sole system of record for legacy credentials.
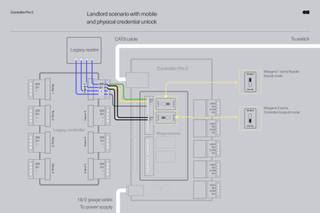
- On the legacy controller, locate the input where you have your legacy reader wired
- On Kisi Controller Pro 2, select two available Wiegand device interfaces. You will need one for
CONTRLmode and one forREADERmode.
Wiring for READER mode
Your Wiegand device interface in READER mode will be in charge to read credential information that is presented to the legacy reader.
- Wire the D0 port on the Wiegand board to the D0 port on the legacy controller's input (Data line 0)
- Wire the D1 port on the Wiegand board to the D1 port on the legacy controller's input (Data line 1)
- Wire the - port on the Wiegand board to the - port on the legacy controller's input (Ground). Always verify that the ground is securely connected between the legacy controller and the Kisi Controller Pro 2.
- On the Wiegand board, toggle the switch of this specific Wiegand interface to
READERmode
Please note that on certain Wiegand products, as well as on some of our Wiegand board offerings, the notation of "+" typically denotes 12V, while "-" signifies GND (ground).
Wiring for CONTRL mode
Your Wiegand device interface in CONTRL mode will be in charge to send information back to your legacy controller.
- Wire the D0 port on the Wiegand board to the D0 port on the legacy controller's input (Data line 0)
- Wire the D1 port on the Wiegand board to the D1 port on the legacy controller's input (Data line 1)
- On the Wiegand board, toggle the switch of this specific Wiegand channel to
CONTRLmode
For further functionality, you can wire the following pins:
- G: Green LED
- R: Red LED
- BZ: Buzzer
If you want to connect your legacy controllers and readers to the Kisi Controller Pro 2 simultaneously, you can wire up to two legacy readers and two legacy controllers to the Kisi Controller. This allows you to control up to two doors using a single Kisi Controller Pro 2.
Use Kisi as a shared system of record for legacy credentials
- Wire the legacy reader to both the legacy and Kisi controller
- Access is granted if either controller authorizes the credential
- Perfect for seamless migration of credentials to Kisi
Use Kisi as a a sole system of record for legacy credentials
- Wire the legacy reader only to the Kisi controller
- Access is granted if the Kisi controller authorizes the credential
- Perfect for customers to have complete control over access authorizations, independent of the legacy controller
Once ready, go ahead and assign a door to your legacy reader.
Wiring two Kisi Controller Pro 2 units together via the Wiegand board
As a tenant in a multi-office building, you may encounter that the landlord is using another Kisi Controller Pro 2 at the joint main entrance door. In this case, you can connect your Kisi Controller Pro 2 to his unit via the Wiegand board and use mobile unlocks only.
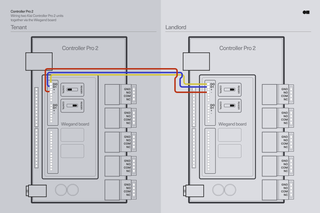
- Wire the D0 port on your Wiegand board to the D0 port on the landlord's Wiegand board (Data line 0)
- Wire the D1 port on your Wiegand board to the D1 port on the landlord's Wiegand board (Data line 1)
- Wire the - port on your Wiegand board to to the - port on the landlord's Wiegand board (Ground). Always verify that the ground is securely connected between the units.
- On your Wiegand board, toggle the switch of the used Wiegand interface to
CONTRLmode - On the landlord's Wiegand board, toggle the switch of the used Wiegand interface to
READERmode
Once ready, go ahead and assign a door and a credential to the controller.