Install the Kisi Reader Pro 2
In this step, you will install the Kisi Reader, Kisi's second most important hardware unit that enables you to access your doors with the Kisi system.
Reader kit components
- 1x Kisi Reader
- 1x aluminum mounting frame
- 1x backplate
- 1x security screw: #4-40 x 3/8 inch (9.5 mm) - flat top
- 1x hex key: 1/16 inch (1.5 mm)
- 2x screws for mounting
- 2x self-tapping screws (for metal frame)
Tools required
- A screwdriver/hand drill
- A #2 Phillips driver if mounting on mounting box
- 7/8 inch (22.2 mm) drill bits if mounting on aluminium profile
- 1/8 inch (3 mm) drill bit for pilot holes
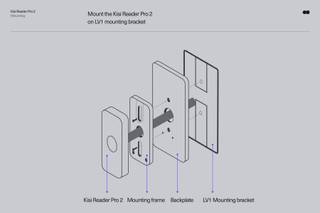
Mount the Kisi reader on an LV1 mounting bracket
Make sure the reader is unobstructed by avoiding placement behind glass or aluminum. Mobile credentials like Tap to Unlock and MotionSense may not function optimally when used through such materials, especially if they are tinted.
note
The mounting frame and backplate provided by Kisi are LV1 compatible.
- Secure the backplate and the aluminium mounting frame to the LV1 mounting bracket by using the two wall mounted screws
- Connect the reader to the cabling in place (Cat 6 or low voltage wires)
- Insert the reader inside the aluminium mounting frame
- Slide up the reader
- Secure the reader by installing the security screw (hex key provided)
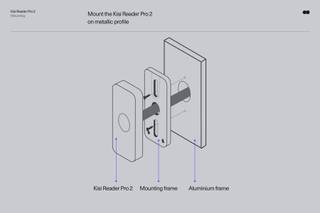
Mount the Kisi reader on a metallic profile
tip
Before you begin installing the reader, make sure to note down the device token, device ID, Ethernet MAC, and, if applicable to your model, the Wi-Fi MAC. This information can be found on the back side of the reader, as well as on its cable and may be needed afterwards.
- Drill a hole of at least 7/8 inch (22.2 mm) of diameter in the metallic profile
- Secure the aluminium mounting frame to the metallic profile using the two self-tapping screws
- Connect the reader to the cabling in place (Cat 6 or low voltage wires)
- Insert the reader inside the aluminium mounting frame
- Slide up the reader
- Secure the reader by installing the security screw (hex key provided)